
Stripdown & Refurb - Hoover Purepower U3350 from 1999
The Hoover Purepower is the last 'Hoover' designed upright cleaner before the company fell apart, and production left the UK and moved abroad. This model was fully caught up in the Free Flights scandal, and the fallout from that. The early models (of which this is) were made in Cambuslang, and the design is still being made today, in china!
The story of this one starts with my Aunt-in-Law, who had been given 2 'Hoover' vacuums, and wondered if I could get one working for her. What she dropped off, was this!

Handily, the bagless one was missing several key components, so the decision was easy, especially as I had several spare parts for it in the shed!

Nice royal warrant on show

And on with the stripdown


First off was the rather fluffy dusting brush

Which has certainly seen some use!


Then the Upholstery tool, which has the later designed brush strip

Next was the extension tool and scabbard crevice tool

And a filthy hose

The ends of the hose come off easily to aid cleaning

Onto the machine itself now! This panel houses the post motor filter

This machine has a quite filthy bottom of the range filter (higher models had HEPA cassettes)

Behind the filter shows a tale

With the bag door removed (nothing to strip down on that) and the bag removed (there wasn't one fitted...) we can see the pre motor filters

Which were quite mucky

I think this has been used with poor copy bags for a long time

Time to remove the handle now, the screw just above the helpline sticker (long since disconnected, but the message telling you this is in scottish, which is a nice touch!) and at the base of the handle needs to be removed

The handle then pulls off to the rear

This black bar guides the long screw through the handle and into the hole in the machine

It just lifts out

The filter cover latch pops out of the filter cover

Sitting behind the handle is another screw

And along with the 2 screws at the front

The switch panel can be removed

The switch, switch cover and bag full LED lens push out of this cover, once the wiring has been disconnected

Leaving tis

At this point, the mains flex can be removed and stop being in the way!

Next, we can disconnect all the wiring

Removing the bag door seal reveals the wire that runs down to the motor

With 1 screw the wire harness can be removed from the machine

The pressure switch that activates the bag LED pops out of the cradle

Which is now empty.

Moving down slightly now, the bag holder can be unscrewed

Which also releases the rear handle/hose holder

Removing the bag fill support releases that and the lower cord hook/wand storage part

Empty

The Upholstry and Dusting brush are clipped in with this plastic clip that pulls out

With that done, the top half is empty! (the cable exit guide is impossible to remove so I left it)

Down to the bottom then! The height adjustment knob pulls out of the hood

2 screws at the back of the hood (you can see one hole here) and the hood is free to be lifted from the back (it slots in at the front)

On the hood sits a seal to stop the air leaking out of the brushroll housing

These felt pads seal around the brushroll to stop the belt area filling up with shite

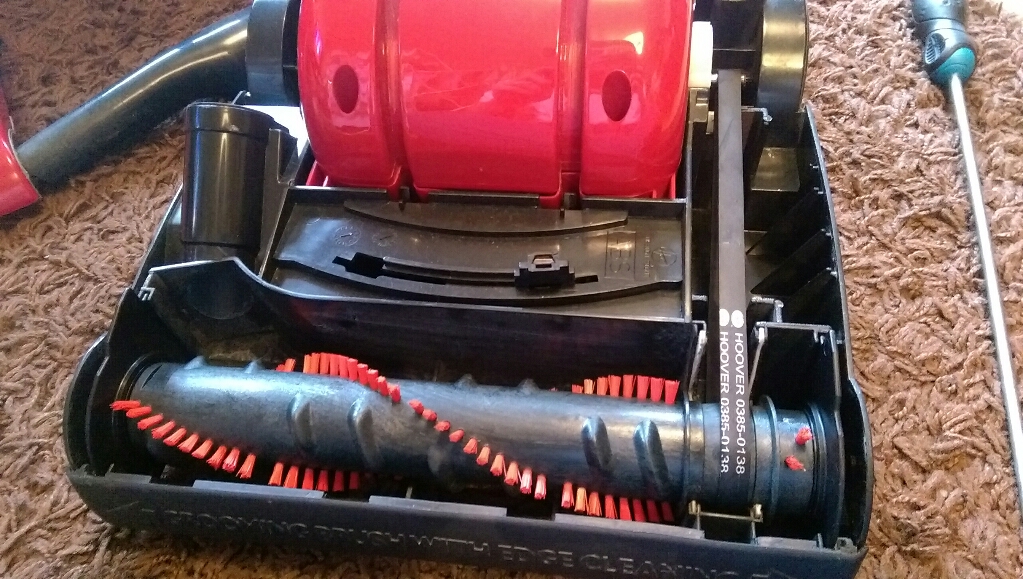
The VERY worn brushroll can be removed

The end caps pull off either end, and you can strip it further, but I did not, as it really needs to be replaced, so we'll leave it alone for now.

The lower chassis is held on to the middle part with these plastic retaining rings

Which push out and off like so

The 2 halves can be separated now

Luckily, the wheels on this early model are held on with a nice circlip, rather than horrible metal clamps, so they can be removed

Moving to the front of the chassis now, the furniture guard pulls up and off

More felt brushroll pads on the bottom half

This is the notorious Purepower release pedal, made of the finest cheese

Held in with a locking tab underneath

And looks like this once removed.

Just inside the hole where the hose goes, is a rubber seal

Underneath, the centre wheels are held in with this horrible spring clip. If you don't have to remove this, I advise you don't. they can be a pain!


With the clip removed, the wheels pivot up vertically and pull out of the chassis

The wheels pop off easily from the axle

The stepped part that adjusts the wheels falls out of the chassis once the slider meets up with the notch in the chassis.

Next, we can move back up to the motor, and remove the 4 screws holding the motor cover on

The motor, and the housing seal (as the cable passes through it) lifts out

Finally got a shot of the ratings plate

Onto the motor now, not much to do here. Fancase seal off for washing

Armature doesn't look too bad

I didn't strip the motor down, as the fan wasn't too bad, it all just got a good dusting off

When I put the hose in the washing machine, I put the post motor filter in as well, just to see what would happen, and a top tip here is not to bother!

as it falls apart!
So, everything is apart, washed, dried and polished! Time to re-assemble.
And the first thing to go back on is the motor fancase seal

Next, the motor housing seal was fitted

One thing I forgot to mention in the stripdown is the little tube that feeds the bag full sensor, which sits down the other side of the bag housing to the spinal cable.

Next the motor can be fitted, running the spinal cord through the hole in the seal


The cover can go back on

And to stop it flopping about, the wiring at the top can be fitted, sans mains cable for now

Bag door seal covers everything up

Internal and external parts screwed back in

Mains switch and LED indicator wired up and fitted

Mains cable fitted

Tool clip fitted

And the cover can go on and seal it all up

One of the reasons I wasn't too fussed that I ruined the filter is that I have a spare!

Nice genuine Hoover filters

The pre filters were fitted

And a new bag

Time to fit the bag door


And then the post motor filter

And it's cover

Down to the lower chassis now, and we fit the wheels, with a smear of grease on the axle to prevent squeaking

Height adjustment stepper fitted

Wheels and spring clip fitted

Release pedal fitted

Brushroll seals fitted

Furniture Guard slid into place

Then the 2 halves can be bought together


At this point, I was waiting for some post, and the hose was not dry, so the bottom cover and height adjustment knob went on to keep them safe, and we have this for now


Much better already!


Which made the world of difference, it's a fantastic machine now!
So there we go! Thanks for reading. If you are wanting to refurbish your own Hoover Purepower, I hope it helps!
Sam


Comments
Post a Comment