Hi! My name is Sam Watson, and this blog is all about my collection of Vacuum Cleaner paperwork! Brochures, Instruction Manuals, Service Manuals and everything inbetween! If you collect, or have an interest in Vacuum Cleaners, this is where you need to be!
To view brochures by Brand, click the Menu item in the top left corner, and choose your brand from the list of tags! Or just get scrolling and enjoy.
Hoover Junior 119 (Scheme B) - Stripdown and Refurbishment
Get link
Facebook
X
Pinterest
Email
Other Apps
So, a good while ago now, I bought this from ManchesterVacs for £not a lot. They got it given to them, but didn't really know what to do with it
Let's see what's inside!
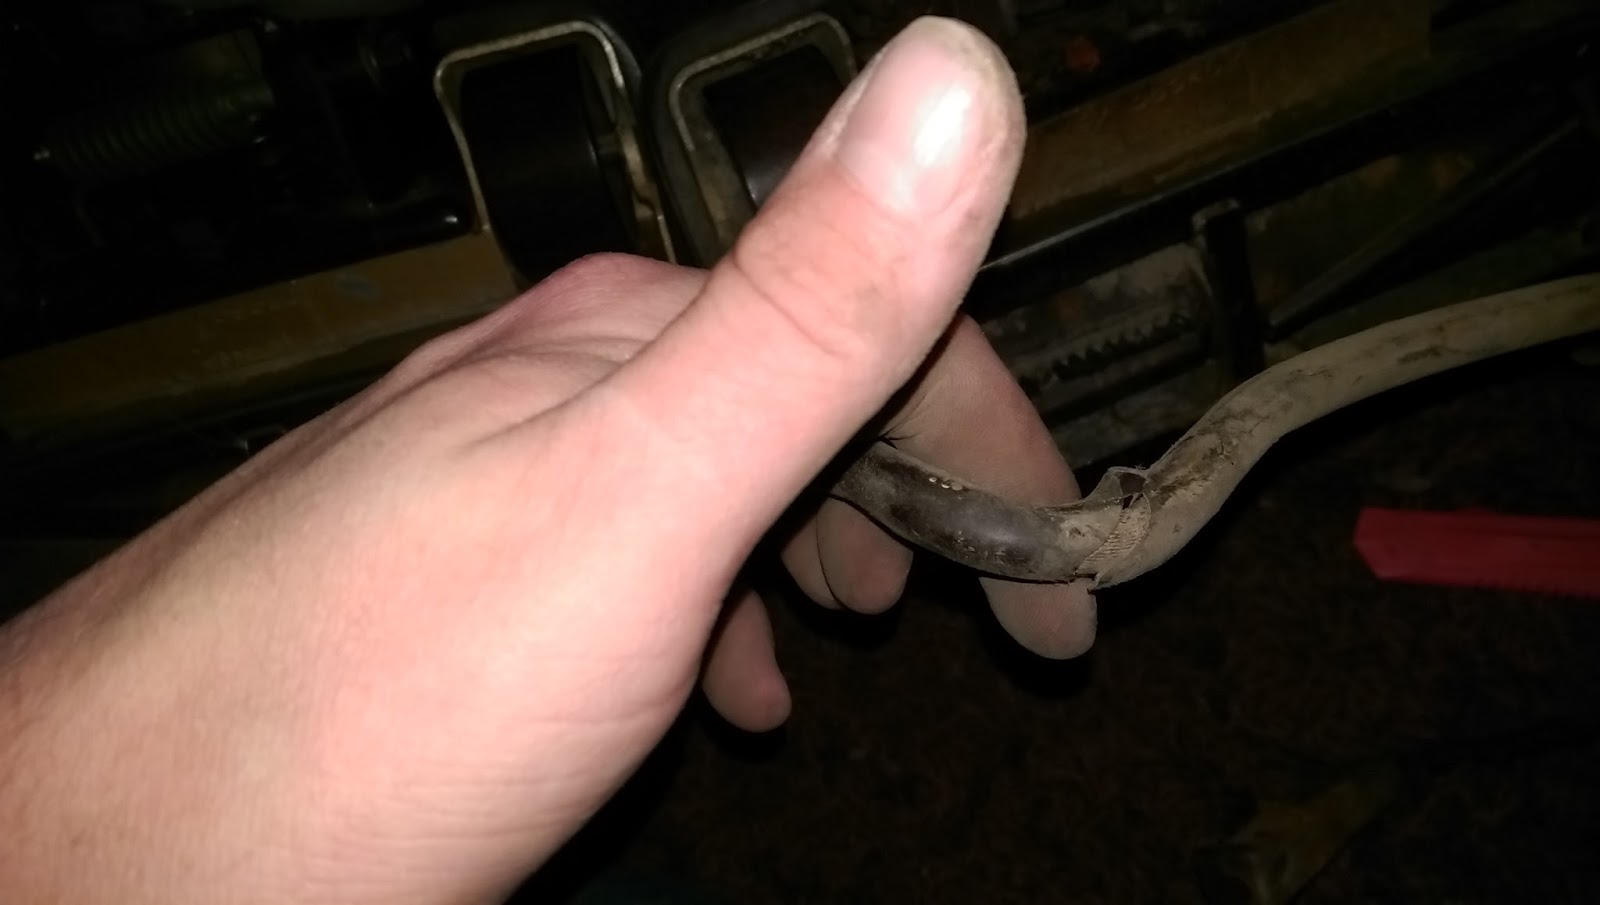
The first thing that caught my attention was the awful cable
Underneath the tape revealed the sheathing to be brittle and cracking
Parts of the broken cable look burnt
But closer inspection reveals it's just where some proper old tape has been sat, no fire here
Next up is the bag! Sadly not a genuine brown one, but a genuine Hoover replacement, possibly from the 60's/70's
It's a tad full...
Let's have a look at the main part of the show!
I think I'm right in dating this to 1950 (up to serial number K10,000)
The other reason this was quite cheap, was it didn't actually work. Turns out the switch was broken, so time to have her upside down and take the wiring cover off the bottom
The switch sits up top, the 2 top wires run from it into the main loom
To get the broken switch out, pop the top of the switch up off it's latch
Then the other side slides off the lower part of the bracket
I neglected to take any more pictures of this stage, but with the red pedal off, there is a nut to remove from around the switch plunger. With this removed, the switch is free. Undo the wiring terminals and remove the switch. To test it, I joined the switch terminals with a piece of wire, so it was 'on' all the time, lobbed it back together and gave it a test
It runs fine! Time to clean the bag up a bit...
It's messy, but you need to turn the bag inside out
Where vacuuming can commence, I used my 1989 Aquamaster for this
I spied some tape on the bottom, so had that off and found a hole
Bag clean, I gave it a proper test run
Works well, but I then noticed the belt, which looked a bit past its best
I found my spare belts, and Eva held them for me whilst I chose one
The old belt wasn't too stretched, but it was a tad perished
The brush strips looked spot on though
New belt was fitted
and I gave it another go
Lovely. It went in the hallway to await it's turn next to a DC18 (which I still have not touched...)
So, we know it works, and runs and cleans well. So, time to refurbish it! We start with the bag
Turn it inside out again, then tug on the fold by the bag connector until some string becomes visible
You need to cut this string off
And pull the bag collar out of the bag
There's a nice clean line where the bag has been hidden behind the string!
I don't like putting original/old bags through the washing machine, through fear of the lettering coming off/fading, so I filled a bucket with warm water and washing powder and made some soup!
With the bag off the bag slide, I gave it a polish to see how it would come up
Very well is the answer!
Onto the machine itself now
I started with the plug, which was probably the original MK as fitted when the machine was new, or if not, it matches it really well!
I opened it up
And took it off the cable for washing (which is always fine as long as you dry it out fully before plugging it back in!)
Now, remove the upper handle bolt
And take off the cable guide
The top of the handle pulls off the lower handle now
The handle grip was loose, so I removed it to make washing easier
The lower handle bolt is next out, and this releases the lower cable guide
and the lower handle itself
This bracket here aligns with the lower handle bolt and prevents the handle pulling up
The mains cable is now clipped to the handle fork, where it then goes into the machine
The clips are removed with a flick of a screwdriver, once one side pops off, they fall off
The next step is to seperate the motor housing from the brushroll housing, there are 4 screws to undo here
And then both sides split apart
The handle fork is held onto the motor housing with a threaded bar on either side of the fork, so undo the nut on one side first
ensuring the nut and locking washer are recovered
Move to the side with the spring, and undo the other nut
The handle fork will lift off each stud and off the machine
The handle base is rivited onto the handle fork, and 2 of my rivets were loose, so I removed them
On either handle stud is a metal spacer
Now, turn the machine over and remove the wiring cover
The ratings plate is held in with 2 bent tabs of metal, and with the tabs straightened, the plate lifts off the bakelite cover
We can now remove the mains cable completely
The actual cable pulls out of the shielding, and out of the cable grommit halfway up the handle
I binned this cable, as it is ruined!
The 2 studs either side of the handle fork is a long bar that runs through the machine, and has a spring along its length to provide the handle spring the machine has
To remove the spring and bar, tap the retaining bar out of the axle
And pull the whole lot through
On to the wiring now. Below, you can see my bridge wire, which makes the machine run when power is applied, the switch wires would normally connect between these terminals
The other wires are the motor power leads
Undo everything!
Now to start removing the motor. Remove the 4 screws that sit around the fan
With the screws removed, the armature and fan housing will pull forward and out. The rubber seal may be a bit stuck, but it'll come!
The seal should pull off the outer edge of the armature housing. If it's scrap, it can be replaced with a nice bead of silicone sealant, so get it off anyway!
Now it's time to get the fan off. You need to hold the armature with one hand, and undo the belt spindle, which is a LH thread (or the wrong way). You might be lucky and it'll be do-able with your hands, or you might need some grips and a rag to avoid damaging the belt spindle. Either way, once it cracks off, it'll spin off easily. The fan then lifts off the armature end
Nice bit of branding on the fan
With the fan off, several washers and spacers will sit underneath. Make a note of the order, and remove them all
The armature will not pull out of the front bearing
This is the front or fancase bearing. This one is OK under all the filth, but if you need to replace it, you need to drill out the rivets and re-rivet, or find some special Hoover bearing fitting bolts.
This is the armature. Nice and clean. If the Comm (where the carbon brushes run) is black, polish it up with some fine wire wool, but be sure to brush/slow off all fragments of the steel wool
The carbon brushes are accessed by unscrewing the caps on either side of the motor housing
And here they are! Lots of life left
This bracket holds one end of the wiring cover/bottom plate on, and removes with it's single screw
We now need to remove the field coil. You can see it's screws here
But before you go pulling it out, you need to unhook the clips from each carbon brush holder
Then it pulls out
One fluffy coil
The coil actually sits inside a case, 2 small screws hold it in
Now the coil is out, the rear bearing can be seen
The carbon brush holders are held in with a screw each, and just pull out
The fluffy rear bearing is held in with 3 screws
The wiring terminal block slides out of it's housing
Rear wheels now
One screw, and lots of spacers
I then noticed this little wire
Which didn't seem to do anything or go anywhere, so I removed it
Empty!
The rear wheels are held onto the axle with a C clip either side
Which pops off easily enough
The rear of the machine done, it's time to move onto the front
Remove the belt guard
and flip it over
Flip the lower belt guard up
Then, release the brushroll clamps either side
Like so
The brushroll lifts out now. As do the circlips holding the front wheels on
The wheels come with a spindle, 2 washers and the circlip
Done! The bumper could come off, but you need special 'long' rivets, which I do not have, so I never remove it, as I wouldn't be able to get it back on!
Same with the baseplate. You could remove it, if you were going for a full shotblast and re-paint you possibly should, but I left it alone!
Onto the brushroll now!
There's a bit of a tidemark of filth on it...
Hold both end caps in each hand and twist. One will unscrew, so take that off, then pull the side that did not come off out of the brushroll. Then, using some grips, hold the axle and undo the other end cap
The bakelite bearing holders come out of the metal housing with some gently levering. Then the brush strips can be popped out.
The brushroll may now be sick
However, that's the machine stripped down! Everything got a wash and dried thoroughly in a warm place so it didn't flash rust. I then took some of the brightwork for a polish
This is the main housing. The front metal part got a wash, then a good going over with Cif to get all the marks off, then several goes with G3 car polish on various cloths. The bakelite got the same.
Inside is just from washing, it comes up well
Time to re-assemble, however I did notice the coil wires looking a little bit sorry for themselves in a dangerous way
So I cut the ends off, and popped new crimps on
The wires leading to the clips that go over the carbon brush holders were also perishing
But I didn't want to un-solder the ends and solder new wires off the coil, so some insulation tape did the job here. Once fitted these wires will not move anyway.
Next, the bearings. They were OK on this one, just dry, so they had a good soak in this
I then found some white flex from a 119 I had a good few years ago and had kept, which was safer than the flex we binned off this one earlier
I fitted the nice brown plug
And started to re-assemble the brushroll, fitting nice new bearings in the process
Carefully pop the end caps back on, they have to line up with some notches, and have to go in level or they bind up.
Refit the brush strips, and the axle, bearings, wobble washers and end caps. It should spin buttery smooth with the end caps nipped up tight by hand.
Time to put some stuff on the chassis
Wheels!
A drop of grease on the axles prevents squeaky junior syndrome
Fit the brushroll
Rear wheels now
Another drop of grease
Grab the rear housing
Fit all the spacers, having wiped them over to check they sit flush with nothing caught up
And fit them
Pop the wiring terminal back in
Take your nice, clean, oiled rear bearing (or new one if you have managed to find one)
And fit it
Coil now
Fit it into the nicely polished housing, and do up the securing screws
Fit the carbon brush holders first though, or you can't get to the screws
Then fit the coil
Pop the carbon brush clips on
Fit the lower plate bracket
Time to re-assemble the armature now
Little drop of grease on the end, just to help as this part rotates against the brass bush slightly
The fancase bearing cleaned up nicely, I couldn't wash it though
Fit the armature into the bearing then fit the lot into the machine
Once that's screwed down, refit the carbon brushes
Check they have good contact with the comm
Assemble all the spacer washers for the fan, after checking the armature spins nicely
pop the fan on
Then screw up the belt spindle. It doesn't have to be ultra tight as it spins itself on further in use.
Check it all spins smoothly, again it should be buttery smooth.
Refit the handle bail axle, spring and locating dowel
I had a working pattern switch, so located that in the shed of despair
Non genuine sadly, but it works so that'll do!
Wire everything up!
Next, take the bottom cover plate
Fit the ratings plate back on
Fit the switch cover
Then fit the bottom plate, making sure to check the cable is coming out of its hole
With the thing wired up, now is a good time to check it works. Just don't try and lick the fan
Once working, screw the 2 halves together!
Next, fit the handle bail. Note the spring that wraps around the axle end to provide some of the spring.
The mains cable clips to the edge of the handle bail
The spring around the axle underenath should be tensioned when the handle is reclined, so it then helps it spring back up where it sits untensioned. If it does not do this, check it's located against the metal dowel correctly, and the other end is butted up against the stop moulded into the housing
Time to re-assemble the bag, you need to tie the end of the bag onto the end locking ring, by having the bag inside out, popping the locking ring inside and tieing some string to the groove as below
I am, however, crap at knots, so a small cable tie proved much better, Note I also fitted the locking ring so the small hole in the bag now sits on the excess that sits inside the bag!
Turn the lot the right way out again and voila!
Getting there
The handles were bolted on, nothing exciting there, then it was time for a test drive, cleaning up after a Dyson stripdown and some general use
So time to clean the bag out again
And some nice photo's of it
I gave it another polish and a few coats of wax this time
And it worked very well, and went up into the loft with the rest of the collection.
For 6 months, then I got given this!
It was very battered, and the bag was a bit full
Let's see how it sounds
It ran better with a new belt
Then I had a brainwave, a way to improve my minto Junior, so it was grabbed from its slumber in the loft
Can you spot a difference?
I couldn't resist
Can't tell the difference... The handle on the freebie one was a bit mullered though
But the paintwork so much better
I started doing a time team on the handle grip
Aha! Metal
The bottom cover was a different type of bakelite though
This one was none too tidy underneath
And buggar me look at that!
50/50
The outer cable guard was a bit split, but not too bad
So it was removed, and chopped off to a nice clean end
Stripped
It has an even nicer old plug
And, I fitted the nice, original, good condition rubber cable to the restored Junior, along with the better handle after swapping the handle grip over. The free 119 went to another collector as part of a swap with another machine of mine for some tools he had for another machine which needs writing up!
I also managed to buy this box of tools from a collector for £10 posted
The hose is even air tight
So all it needs to be super minty is an original bag, and an original hand grip (I have an instruction manual for it too). Should happen eventually, although I imagine the bag will need a whole machine to donate one...
I leave you with this, thank you very much for reading! I'll do a 'my collection' youtube video of it soon too.
I picked this little fellow up from the car boot a few weeks ago for £10. I had been after a diy/car/dirty jobs vac for a while now, and this seemed to fit the bill nicely. However, it had been heavily abused, and had no suction at all so of course I stripped it down! First to be fixed was the hose, I chopped off each broken end and put it back together! As you can hear, he doesnt sound healthy! So, off with his head! Yummy! Found this stuffed deep in the cord rewind system it was VERY dusty! No wonder it blew dust out when turned on Oh, the motor looks fun... I cant believe this still ran! I started unpicking the wiring Cord rewind cables out Thermal cutout for the motor removed identifing the wires one by one Switch and power socket are out Power socket stripped down for cleaning contact rings removed ...
This instruction manual is for the Vax 2000 3 in 1 cleaner. The first of the updated shape after the 121, and the design that Vax still use today with the 6131. Literally, you could swap and change parts around (bar the motor) as you pleased still!


Comments
Post a Comment